WIP: Nissan Skyline R34 GTR V-Spec II
>>
I’m excited to share my progress on the GTR. Its an absolute fav car and I have always wanted to model one. I’ll be using this page to document my journey and updates.
Feel free to follow along or leave a comment.
LETS BEGIN
COLLECTING REFERENCE MATERIAL


I started by looking for a decent set of blueprints. Most of them never align in all views. These ones didn’t either. I ended up working with Front, Side and the Back for the most part. I could either align the Top or the front. I then collected as many references of the R34 as I could. I cannot stress how important reference material is.
INITIAL BLUEPRINT BLOCK-OUT WITH CURVES
I like to start with a solid foundation with curves. I spend a lot of time and try to be as accurate as I can. It helps me to snap the vertex to the curves and be quiet precise with the edge flow. Curves act as a blueprint in the 3d space.
SURFACING / BUILDING USING GUIDES


Today, I patched panels. I worked with polygons 90% of the time. There were times when I used a loft and then converted the surface to polygons or cleaned the flow. My usual flow was starting with the hood > front bumper > side fenders > windshield > roof > doors > rear window > boot > taillights > rear bumper. You can do it in any order. I found that this gave the best flow possible, and I tried to use existing panels to create topology for new panels instead of starting a new panel with a new object.
I used the same method to patch the entire car. If you look at the second-to-last image, you’ll see how I used the curves to lay out my surface.
The colorful images are just envBall mapped into the reflection color of a Blinn material. It helps me see the smoothness of the surface. The wobblier the reflections are, the more it means the surface needs more work and fewer lumps!
In the last image, I added the headlight cover to get a feel for the volume of the car.
SIDE WINDOW SEAL
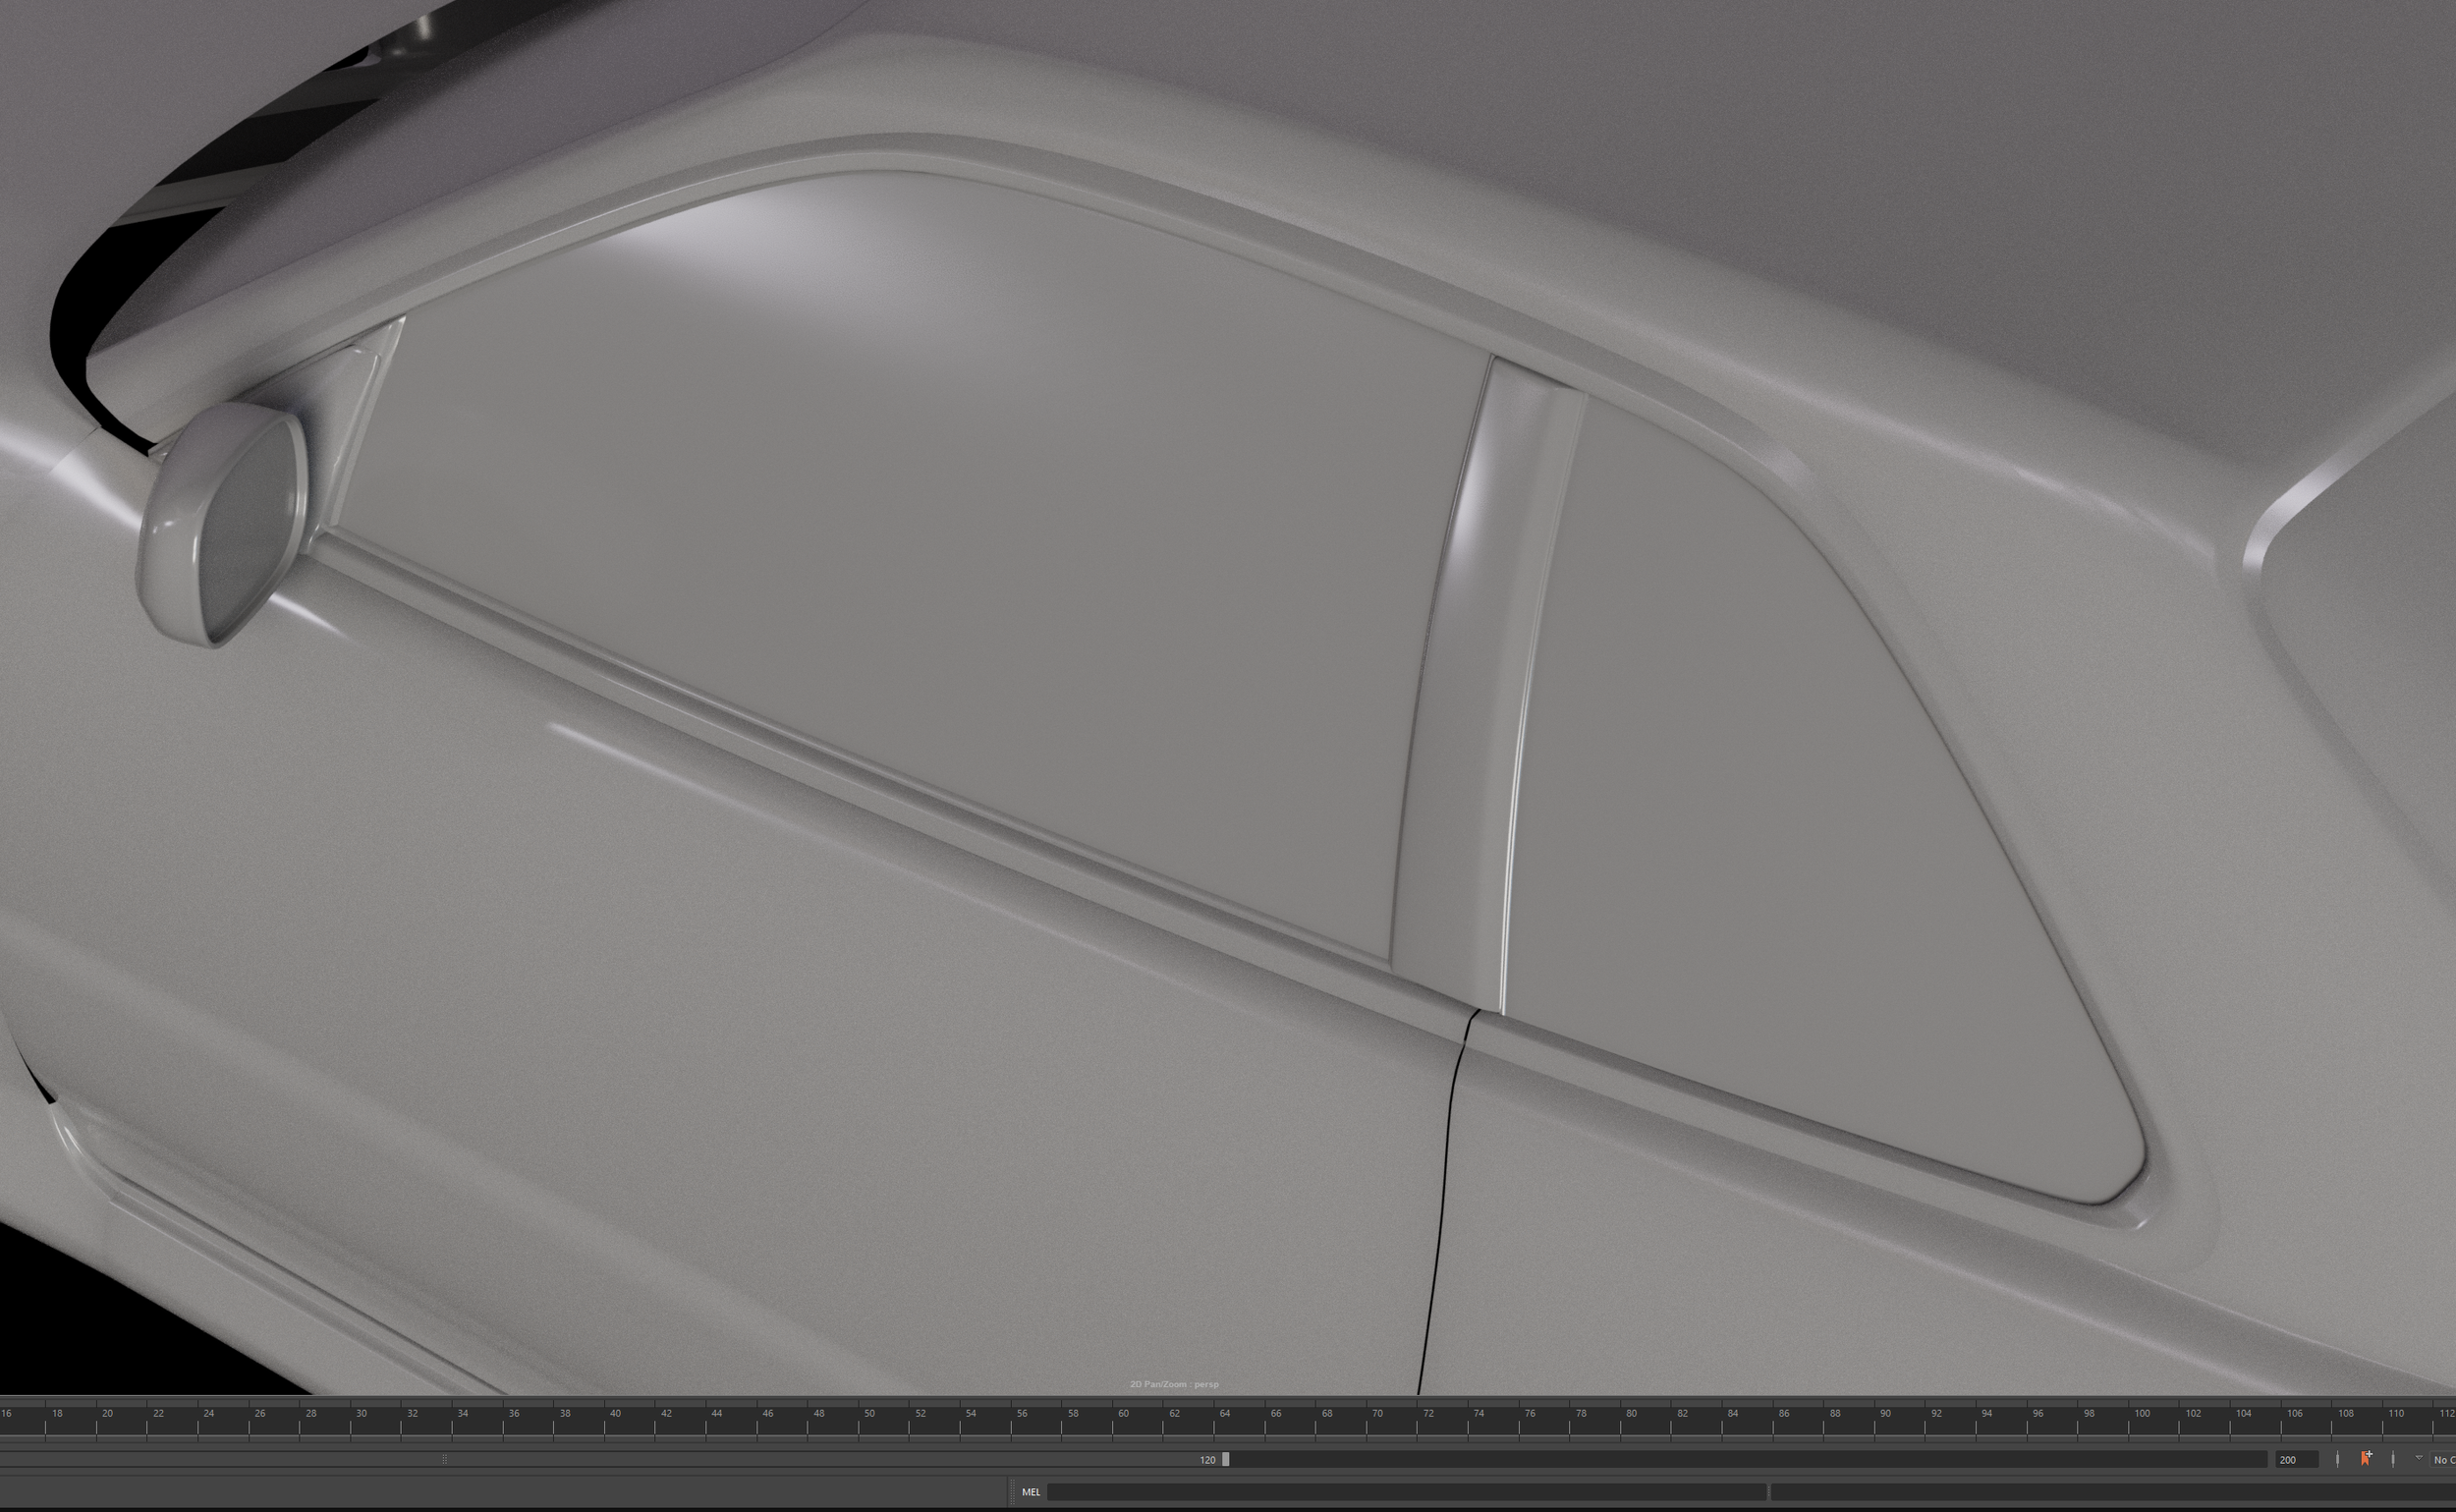
I did a bit of work on the windows today. I finally got the curvature of the windows right. Now it nice and snug in the door frame. I also added window seals. I may come back to windows just to check the seals, so there are no gaps.
HEADLIGHT ASSEMBLY


Today, I did a bit of work on the headlights. I find those so tedious to make. I build part by part. They are all intersecting at the moment. I am not too fussy about that to be honest. Its going to be all chrome and behind a plastic clear housing, effected by refraction I think I can get away with it.
I also use blend-shapes and warp deformer to wrap patterns where needed.
FRONT BUMPER GRILLS


Today, I worked on the grills. There was not much detail in the blueprints so I ended up eyeballing for the most part . I'm unsure about the accuracy but I did manage to match the number of holes to the reference for both the grills
Grills added.
GTR LOGO


Today, I tackled the logo and it wasn’t easy to make because of all the angles. I initially used curves to block out the logo and the height and the depth then ended up using polygons to snap to the curve.
You can see in the last image. It fits really well.
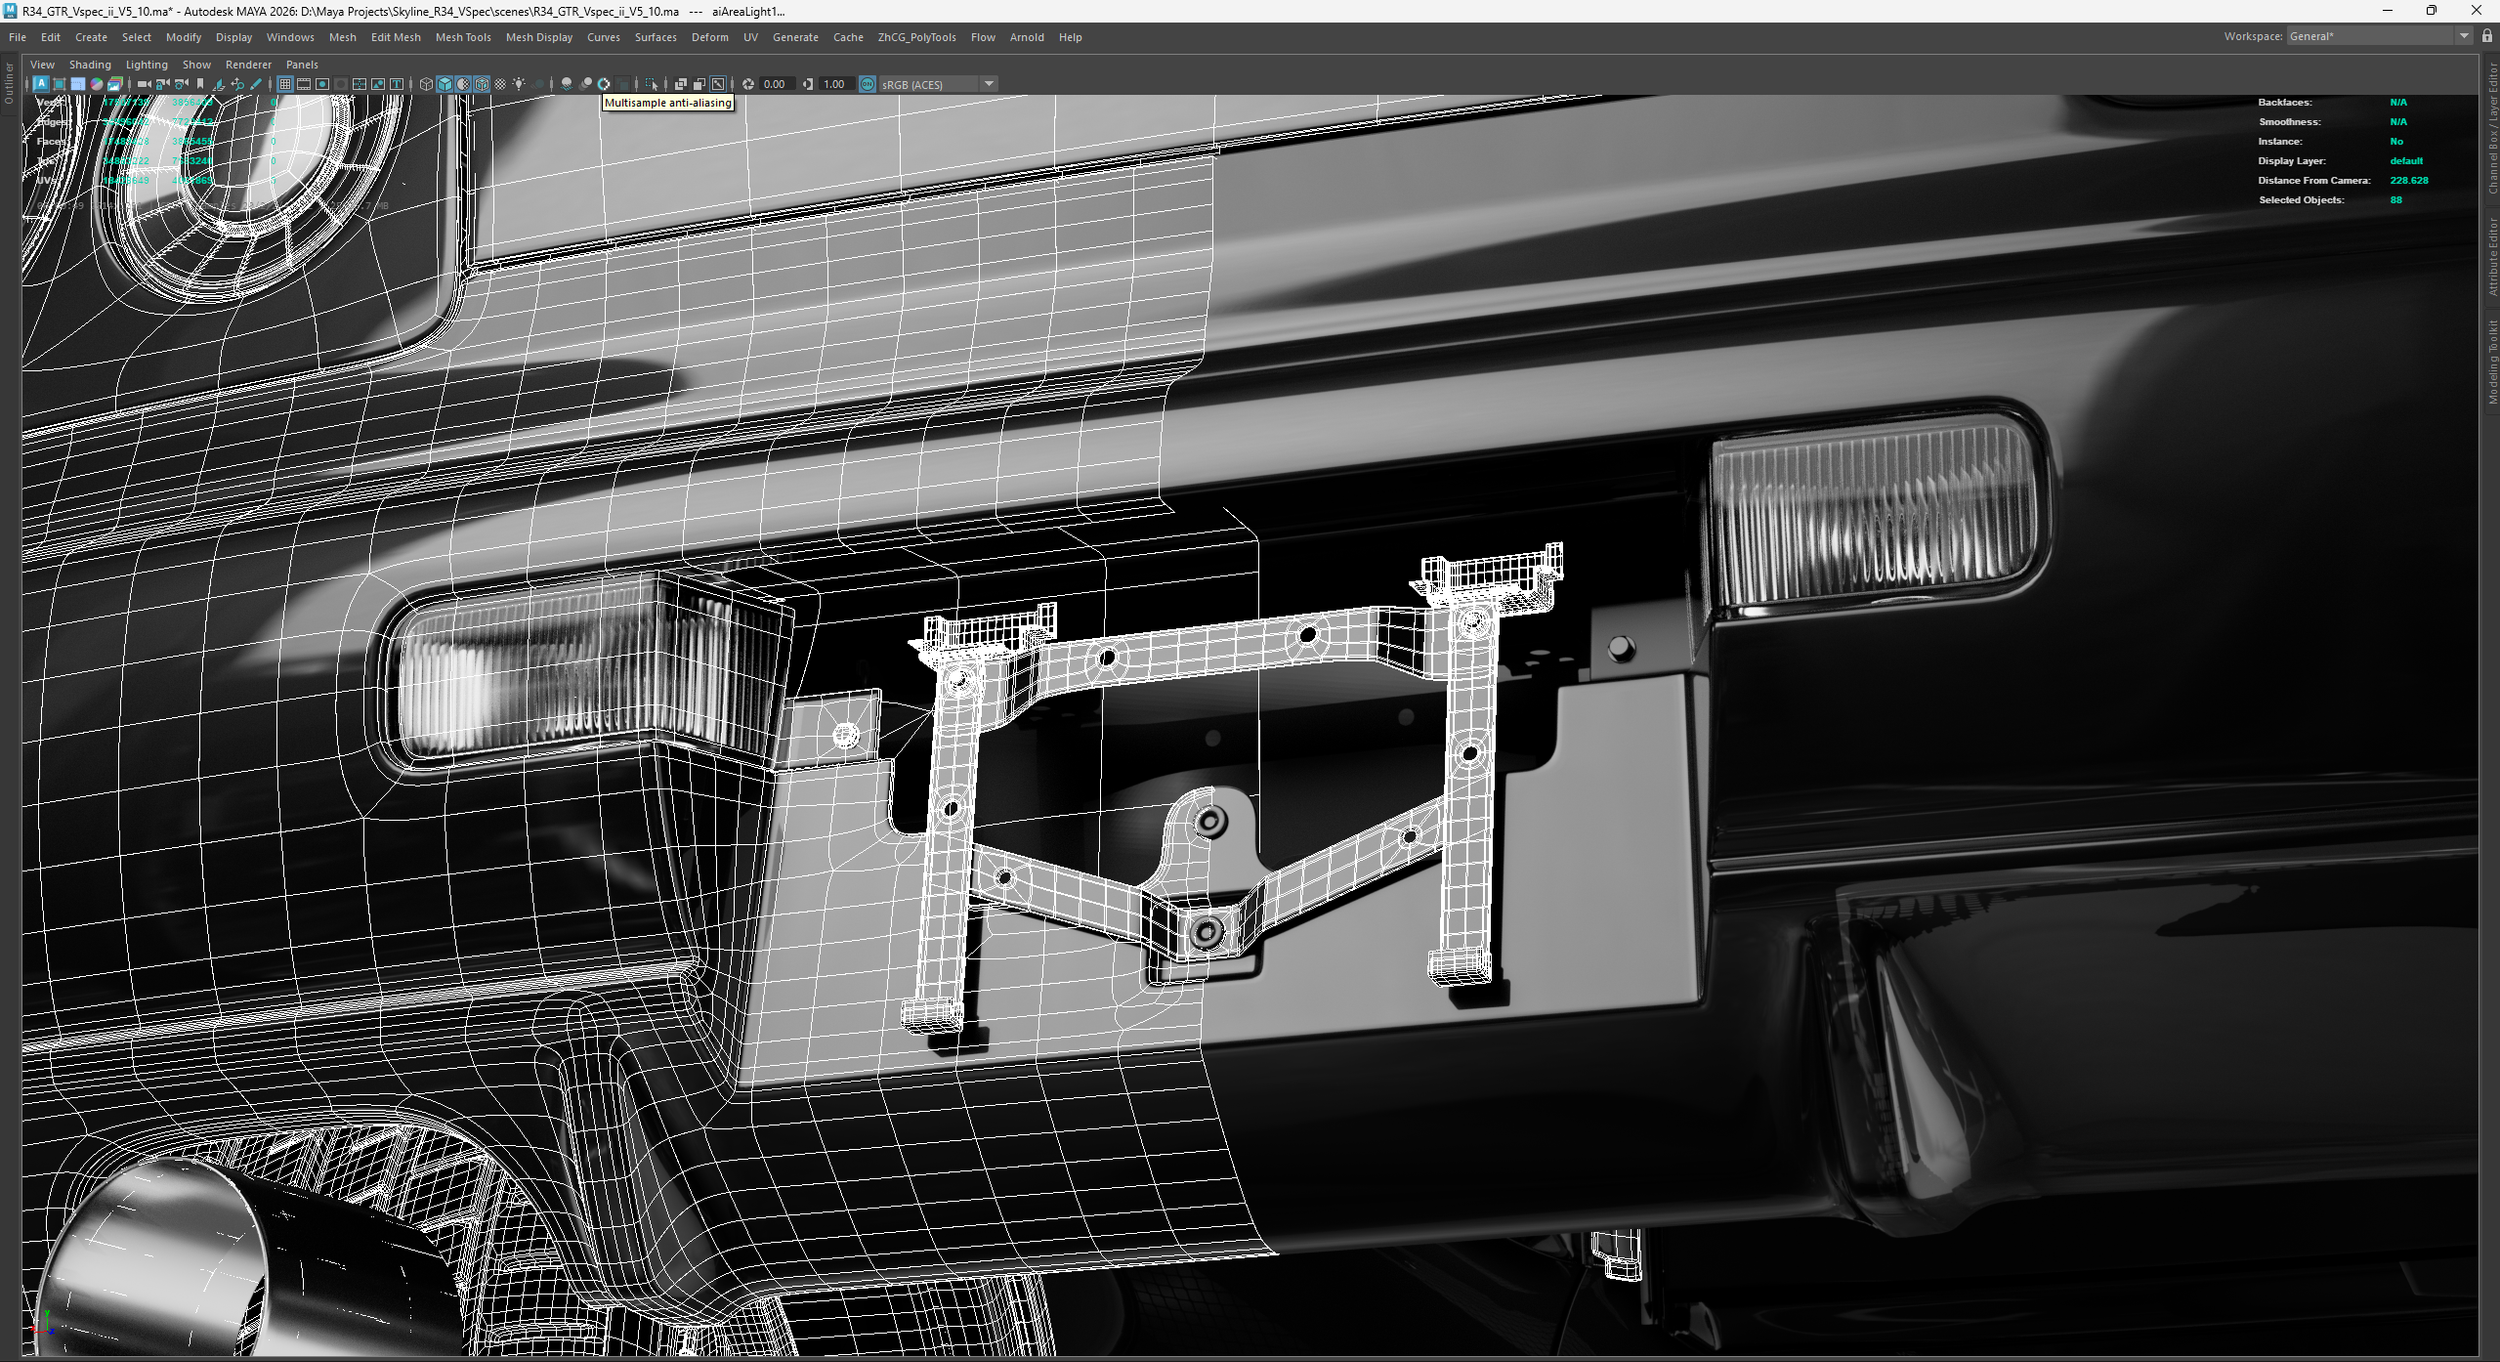
LIC PLATE MOUNTING POINT


Today, I started doing the lic plate assembly. This honestly isn’t needed. I did it anyways. I thought if there was an angle where you see just being the lic plate. That would be a nice little detail.
WIPER AND BASE ASSEMBLY


Today, I did a bit of work on the wiper base and assembly. Wipers are another tricky part to model. They have this slight curve that sits on the windshield. I am yet to add that. I'm going to ask one of my friends to rig this for me so I can use a rig to bend the wiper blade to fit the windscreen.
I also worked a bit on the windscreen. Research showed the thickness of 0.520 cm
HOLDING EDGES AND PANEL GAP ADJUSTMENT


Today, I did fair bit of work on the panel lines. Did holding edges for the most car. There are some parts that I cannot add yet as there isn’t enough resolution like, tail light, front fog lamps, door handles etc.
I also ended up some beauty renders. The shaders are temp.
NISMO LMGT4 RIM - PART 1


Today, I started working on the rims. I am kind of taking a break from the body. This one is tricky as I do not have any blueprints for this one. I am using a photo for the front ref and also matched a camera for quarter view. I found the focal length to be 105. Which gave me a close match.
NISMO LMGT4 RIM - PART 2


I will do a new Tyre later in the stage. I am leaning more towards Semi-Slick / Race Tyre. The Tyre above was done for a BMW I made a while back. ( never finished, lol )
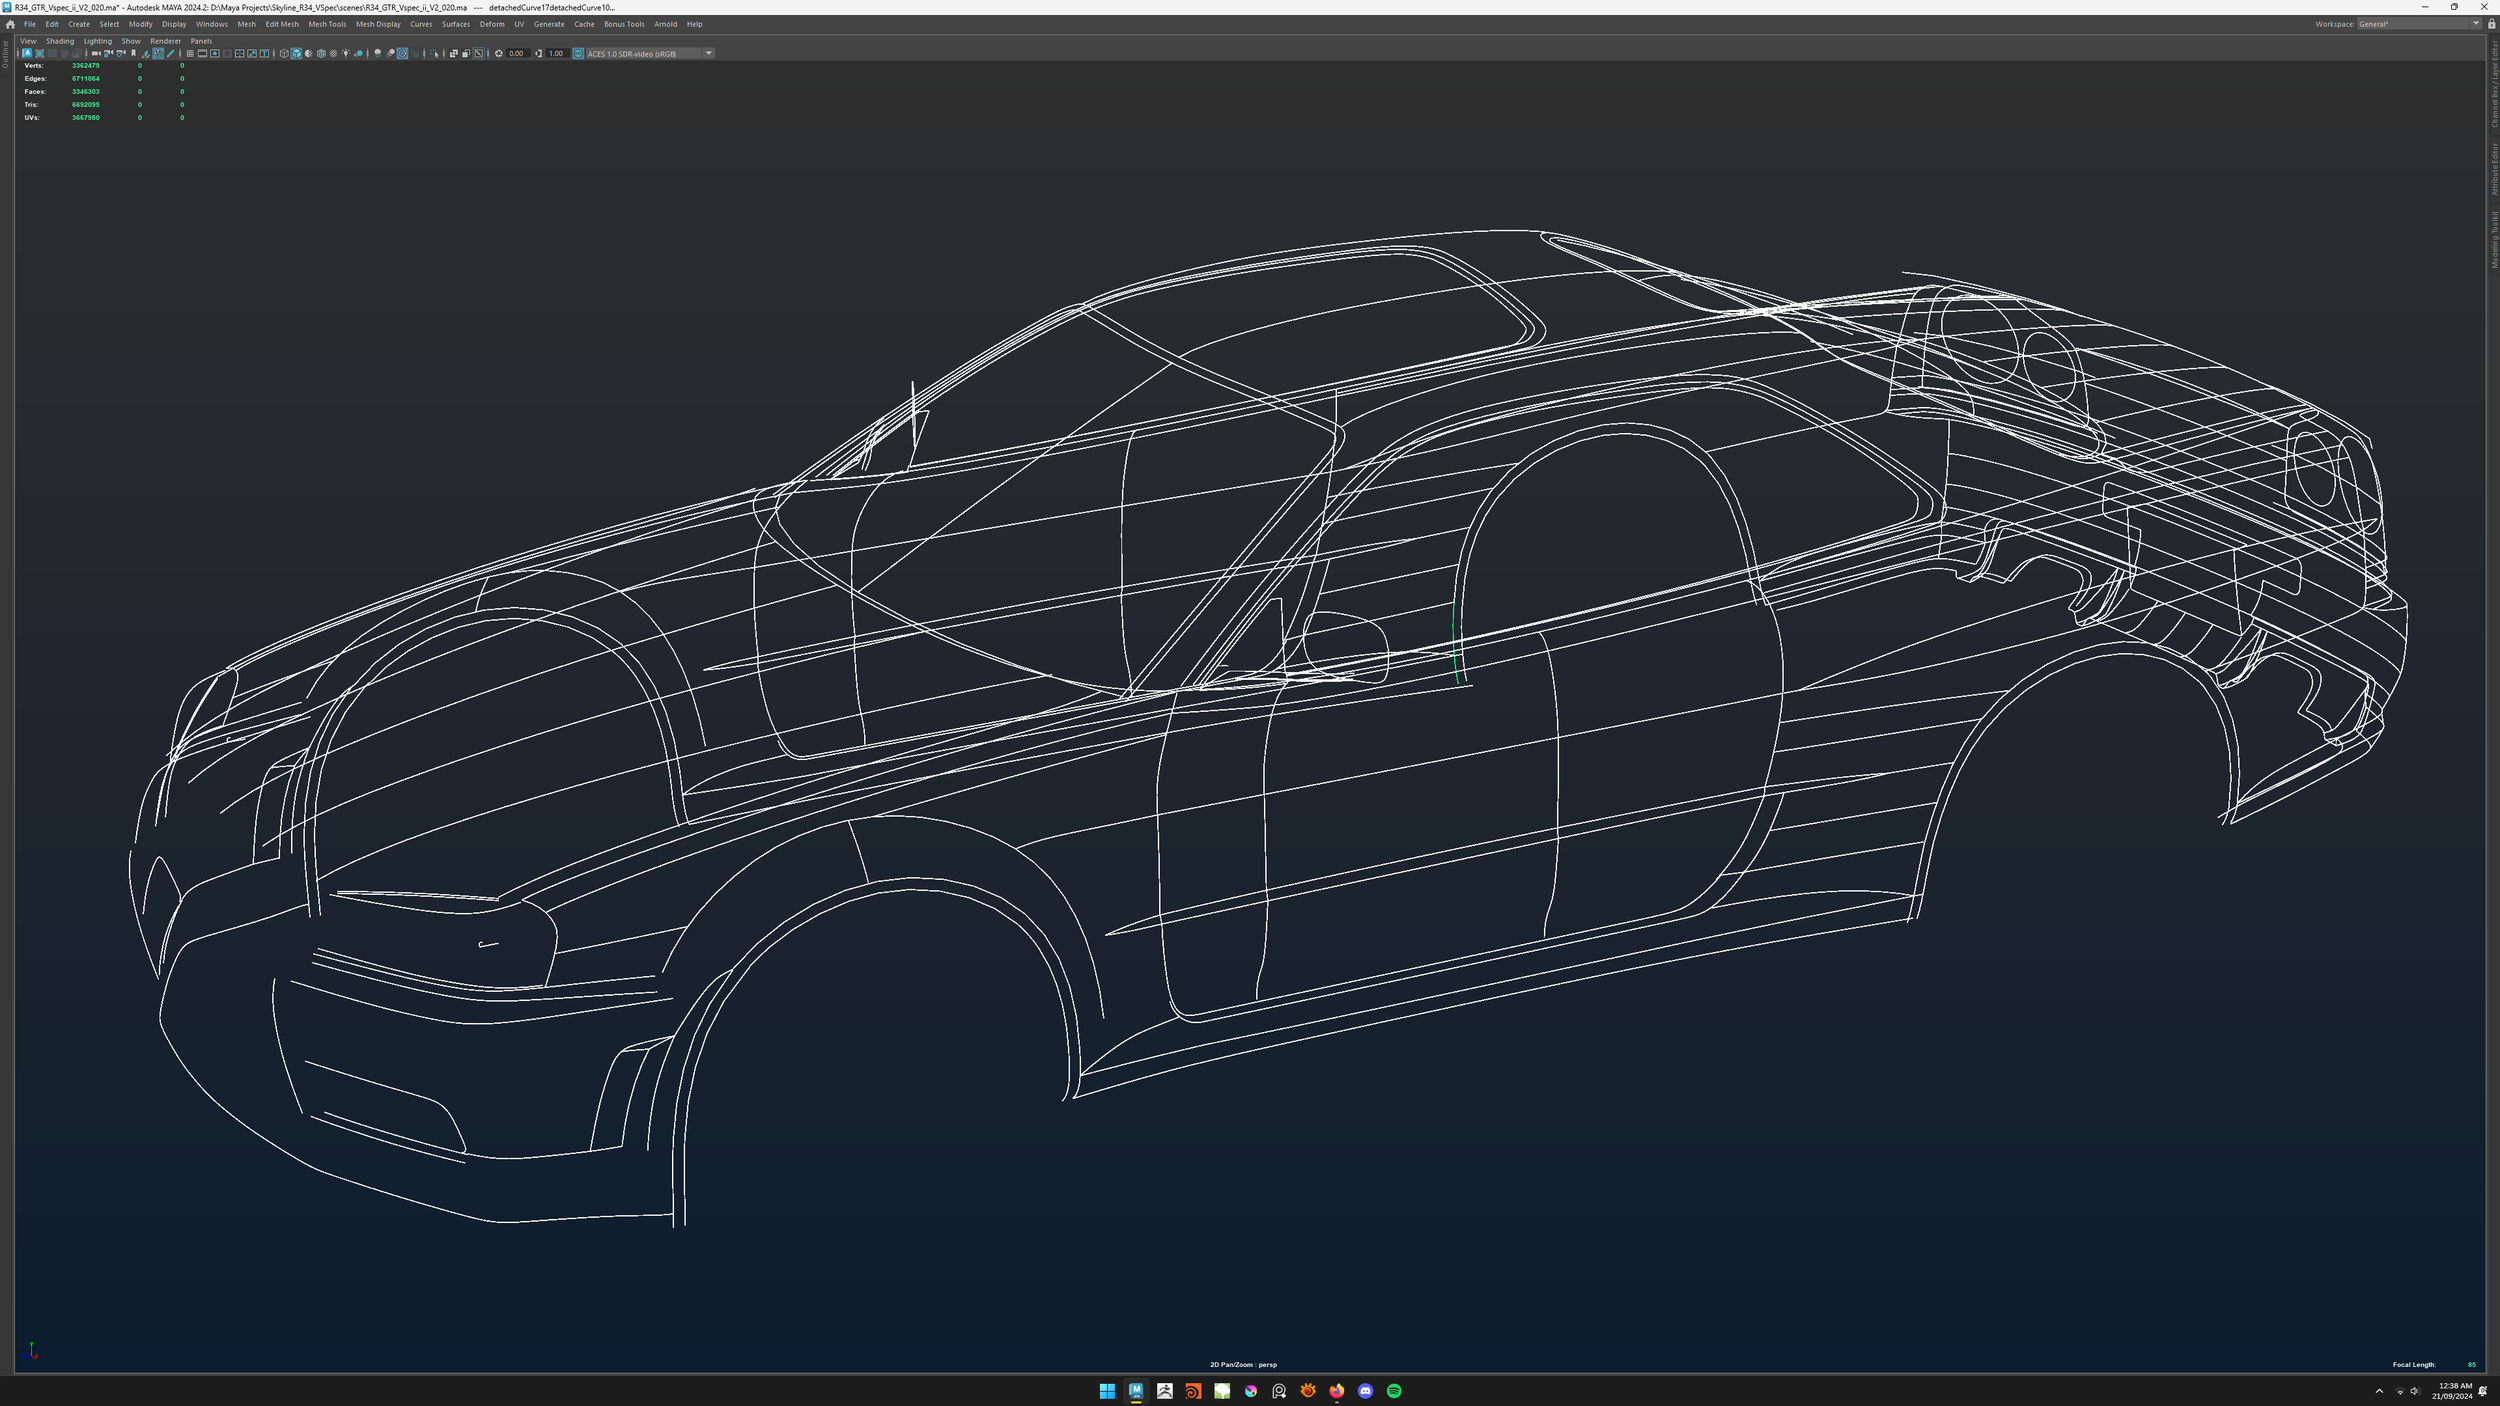
R34 GTR WIRE-FRAME PROGRESS


Here are some wire-frame lay over on the model so you can see the underlying construction. I also started cleaning up the outliner for the shapes that I know are clean and so I can also send them to Houdini Solaris for test renders. I have been testing out the renders in Maya so far. Ill be doing the full renders in Houdini later in the stage.
NOTE: For your, mine, riggers and texture artist’s sake, please name your geometry in the most logical way. They will appreciate it. Add wild cards if you plan to do lookdev. Wildcards are extremely useful when assigned shaders in Solaris / Stage. Eg:*_carpaint*
TAIL LIGHT


I started the tail lights. I was so caught up on getting the perfect reflections. I actually spent 2 days, just to get the shape right. I was having such a hard time trying to eliminate any wobbles in the surface. When inspecting the surface on reference images. You can see how wobbly reflections are in real light. Cars aren’t perfect. On micro level there is so much inaccuracy, imperfections and reflections aren’t smooth. Its a man made object in the end.
The round light housing took some time to figure out. I could have gone with using maps for refraction but ended up modelling all the little details. I enjoy spending time on things that don’t matter. I am a creature of habit.
For the light bulb, I modeled a new one for the turn signals.
SPOILER - PART 1


Finally started working on the spoiler. The combination of those round taillights + the spoiler makes it such an iconic back of the skyline.
The spoiler is little tricky because of the shape and how it connects to the side wings.
19/04/2025

I accidentally wiped my working drive while reinstalling windows 11 and lost some of my work. Fortunately, I didn’t loose a lot of work apart from spoiler, side view mirror, holding edges on the rear bumper etc. I had a backup that was fairly old. So… I started working up the model again. I also lost a bit of interest. I think I just got burnt. I am back on it now. Just glad that I have something to build up again and didnt loose it completely!.

NOTE: Take backups!
SPOILER RECONSTRUCTION.


Not going to lie. Re doing the spoiler was pretty rough. It took me some time to figure out how it works. I wont post any new WIPS of the spoiler as the technique I used to build this one is exactly how I did before.
If you see the last image, the underside of the spoiler doesn’t have any panel lines, I need more resolution to cut the panels and add details. I have made all the curves that I will trace when doing the lines. Ill tackle that later towards the end.
REAR WINDSHIELD WIPER


I am not really trying to hit the details. I am just going off the photos from Ebay and making it look “convincing”. Also did a basic parent child rig so I can pose it in place.
NISSAN BADGE


Today, I started doing smaller details. For the Nissan logo, as you can see the process is fairly simple. I am using a combination of modelling fundamentals and combining it with Wrap & Blendshape deformers to wrap it around the base of the badge.
For The GTR logo, I pretty much repurposed the logo I modelled for the front grill and gave it a base for the back.
HFM 324MM ROTOR - BRAKE COMPONENT


Today, I started the brake rotors. I went with HFM 324mm. I spent fair bit of time trying to find the rotor that had technical data ( you can see the reference image). Finding the pattern was the hardest bit. I made one patch and then tiled it (360/*number of segments (10) = 36 degree rotation).
I am dying inside, just thinking about modelling a brake caliper :)
BREMBO GT CALIPERS


Today, I started Brembo GT Calipers and oh boy, he anxiety is real. I am approaching this with the same methodology.
Start with curves > constructing the silhouette > Lay the foundation > Starting patching
Calipers are different, so I can’t use Symmetry through out the construction process. I ended up doing the base with symmetry and then combined all 4 quadrants to make asymmetrical changes.
REAR BUMPER DETAIL & INSET / LIC PLATE


Body: Today I started working on the body again. Started with adding more details on the rear bumper. The resolution of the mesh was low, so I added another level of “smooth” to get more resolution. I use boolean operations where necessary to make my life easier. Its a great tool when used properly and of course cleaning up is required. They are a great way to carve bigger shapes as you can see in the 4th image. Boolean operations are not always the answer. Ill be tackling the small lights and their housing next.
Lic plate holder: Didn’t really need to model this, but I saw some nice photographs where this area underneath the lic plate was exposed. So thought to add a bit of detail.
Lights: The approached was pretty simple. I use the same trick that I did before / wrap deform a pattern onto the shape. See the tail light modelling section to get a better understanding.
HKS EXHAUST


Today, I started to block in the exhaust and went with the HKS exhaust. I think it looks really nice and thick. As usual, I didn’t really have to do all the details. I do quiet enjoy modelling at my pace. I use the basic wrap and blend deformer to wrap the pattern on the inside of the can. For the welding points, its pretty simple actually. I just used a tube and overlap an edge over the next edge to create the wave effect. Its coming along nicely.
TRUNK DETAIL


Trunk light: I started with basic boolean operation to get the shape of the lights to match the ref. Then it was just cleaning up and shuffling edges around to remove any pinching. I did struggle a fair bit to get the shape just right. For the inside. I went with basic geo that would have glow on it and bloom in comp. The over the top plastic bit does have corrugation points for refraction.
Keyhole: Same as above. Boolean and clean up.
Say hello to my dog, Butter <3
SIDE MIRROR


Today, I started to refine the side mirrors. I am yet to build the inner mechanics so the mirrors can fold. It was just basic modelling and adding loops to up-res the geometry so it takes the shape nicely.
I did some basic renders as well to see the flow of reflections. Good to see this car coming along nicely. Now it looks like it has volume and not a skinny shell.
FRONT BUMPER & FENDER SIGNAL DETAIL


Today, I touched up the front a little more. Added another level of resolution to add more details. Also added the blinker on the fender. Reused the bulb.
GAS TANK FLAP / COVER


Today, I tackled the tank flap. Honestly It was brutal. Just to re-route the edges to get the reflection perfect was rough. You can see the edge flow is better in the second take ( last image). Also it feels more clean. I will likely revisit the area to clean up a little more and have a nicer flow.